Here's an old post I made on Tribe. It details my early thoughts and info on greenwalls before I'd actually made one.
Some of this info is WRONG! The Girbaud wall probably didn't have thin tubes at intervals (Blanc spreads his tubes out by at least 8-10 feet) and the backing for the Phyto wall was probably much thinner than I estimated. More like 1/3 of an inch than 3/4 of an inch.
Re: Looking for marterials to make a Living Plant Wall
Sun, January 13, 2008 - 6:20 AM
Hi,
I'm interested in making a planted wall too. Here's some info. Dwell issue Nov 2006 (page 144) has an article on Patrick Blanc. In it he describes a simple "recipe" for the wall.
"10mm thick waterproof PVC slabs covered with polyamid felt, into which holes (pockets actually) are cut for plants; a small hose, punctured every 10cm by a 2mm hole, to run the length of the top of the wall; a timing device to ensure regular, light watering- like a trickle slowly wending its way down a mossy rock. The ensemble is then attached to a metal structure that stands out from a supporting wall, trapping a cushion of air, which acts as insulation."
In addition to this info there is also a plant map of one of his walls which is really what you need to understand what he's planting where.
I live in New York city and there are currently two walls that I am aware of here. One in the Girbaud store and one here:
www.interiordesign.net/index.asp
I have visited both walls (the phyto wall just yesterday) and have been able to gather a bit more info. There appear to be two layers of felt stapled to each other. The outer layer is cut to create a pocket for the roots. Contrary to what I assumed there is some soil around the roots in the pocket. However to avoid insects etc. I think it's probably wise to remove all potted soil and replace with steralized soil unless you are certain your plants are planted in safe soil. Although being a fishtank keeper part of me would argue that insects and whatever else is in the soil mass probably would contribute to the health of the wall. There is also a drip catch at the bottom of the wall. You might also want to see the TV show "21st Century Garden Art The Planthunter Patrick Blanc". I found it on Azureus "Vuze" for 99cents to rent and 1.99 to buy. In in Blanc talks about there being different climates on the wall. The bottom being shaded and wetter and the top being lighter and dryer. This is one of the keys I believe to success. You need to plant the right plants in each area or plant very forgiving plants that do well in quite a range. You might also want to contact Laurent Corradi. He maintained the Phyto wall. He's located at plantwalldesign.com. The polyamid felt is a common carpet liner and should be easy to come by. Also I have yet to see any real mold growing on a Blanc wall and I think this is due in part to the use of the polyamid. You need synthetics otherwise you are asking for trouble. On the phyto wall there was a thick plastic sheet about 3/4 thick. On to that was stapled what looked like a synthetic black burlap and on top of that was the felt. On the Girbaud wall it seemed as if there were many fine irrigation hoses running at intervals horizontally across the wall but I could have been mistaken. In the coming weeks I'll be getting more info so stay tuned and good luck.
Matt
Thursday, December 10, 2009
Wednesday, December 9, 2009
PingMag Patrick Blanc Interview

Click for PingMag Patrick Blanc Interview.
"The Vertical Garden is composed of three parts: a metal frame, a PVC layer and felt. The metal frame is hung on a wall or can be self-standing. It provides an air layer acting as a very efficient thermic and phonic isolation system. A 1cm thick PVC sheet is then riveted on the metal frame. This layer brings rigidity to the whole structure and makes it waterproof. After that comes a felt layer made of polyamide that is stapled on the PVC. This felt is corrosion-resistant and its high capillarity allows a homogeneous water distribution. The roots are now growing on this felt.
Watering is provided from the top with the tap water being supplemented with nutrients. The process of watering and fertilisation is automated. The whole weight of the ‘Vertical Garden’, including plants and metal frame, is lower than 30 kg per square meter. Thus the Vertical Garden can be implemented on any wall without any size or limitation of height."
One I don't think I've read before.
Enjoy.
Matt
Nori's Awesome Wall
It's great when people invent their own ways of doing things. Nori has come up with her own approach to a greenwall system; no soil, carpet padding for felt, fishtank reservoir. I love it! Here's her system in her own words and a link to her blog with lots more info.

Matt, I have a vertical garden that isn't quite what you have described. Mine uses a single layer of nylon felt stapled to a backer board with the plantings using little to no dirt. Here's the first page of posts (lots of pics). Read through to the end for the complete tale.
I am using a single layer of nylon carpeting padding felt (well rinsed before use). The majority of the soil was removed from the planted starts. Anything I had started in water was tucked into a pocket sans soil. Seeds were pressed into pinches of peat moss in tiny pockets.
My wall is fed from a 30 gallon aquarium with two small goldies and a pleco. I started using a 3 gallon bucket with water from one of our outdoor fish tanks. I add a small amount of potash(? - going from memory here . . . ) monthly. I top up the aquarium monthly so combine these tasks. I feed the fish every morning and have the aquarium filter set at 85.
So far my wall is doing awesomely well. I planted it in April. The geranium and begonia have bloomed. I'm holding out hope for the vining black eyed susan and coleus but will probably have to wait for spring.
I am planning a larger plant wall to go on the north wall of our sun porch (glass roof so won't be using the shade loving house plants in this wall). I was able to get some LDPE sheets destined for recycle from a local printer. They're about 3/8" thick and about 3'x4'. I'll screw them to a framework, sealing the seams and staple on my felt.
I like this felt. It feels dry except when the pump is running water through it. It may be best to use 2 layers of felt, but so far the wall is awesome with a single sheet.
Nori
elf at elfnori dot com
Sunday, December 6, 2009
Great Greenwall Blog from Peter in Miami
http://verticalgardenmiami.blogspot.com/
Tons of videos and how to info. Great resource.
Matt
Tons of videos and how to info. Great resource.
Matt
Saturday, December 5, 2009
Added a Translator
While I don't get many visitors to this blog yet the ones I do get seem to be from all over the world. In order to make it easier for all of the non-english speakers I have added a Google translate tool to the page. Let me know if it helps you. Good luck to all the greenwall makers making our world a greener place.
Matt
Matt
Tina's Update
Here's the latest on Tina's wall. If anyone would like to contact Tina she can can be reached at tina at blondiestreehouse.com
Hi Matt,
I finally got to go to your blog- it’s fantastic! You are really making a difference in demystifying things for people. I so applaud you!
Here are some more photos.


I have adjusted the irrigation two more times. I will revisit tomorrow and see how things are going. Because our tube at the top is thinner I have been letting it run longer just twice a day. It has ended up being too wet still. So I have modified the 2nd watering to occur at night only 3 times a week. My maintenance person checked it today and said some parts were dry- but I was hoping for that a little because now I can start to find the perfect wet/dry correlation that will help the plant roots flourish (fingers crossed of course!). Some of the begonias (I used a very small handful of a rex variety) have already failed. They did not send me the exact variety I wanted, so I feel that if I was provided with the ‘nigra marga’ or ‘soli-mutata’ like I requested and have experience with we would have had a better chance at getting these to thrive. We are going to replace them with Maranta, which we had much success with in the rehabbed modular walls.
So far the detritus at the bottom of the pool has been a little bit of an issue for the client, so I purchased a submersible water pump that we will use to flush out the water once a month, thereby giving us a chance to mop up the bottom of the basin. I am thinking I will place a few larger river rocks in the basin to create a visual barrier to the soil. They will be easier to clean than a ton of tiny ones. On the smaller walls, the simple system seems to be the best- it really would have been overkill to put in a drain line…
Anyway- I’ll keep you posted as we go into further weeks and months!
Tina
Wednesday, December 2, 2009
Gavin's Questions
Hi Gavin,
Thanks for your questions.
Did you just have one horizontal tube going across the very top of the garden to water the whole thing, or multiple tubes?
Just one tube on my wall at the top. I'd say one tube for every 8-10 vertical feet although I never measured it on a Blanc wall.
Did you use that regular flexible tubing and poke small holes in it, or was it a soaker hose type thing, or was it one where you had those drip emitters coming out?
I used regular flexible clear hose I bought from my local hardware store and then drilled holes in it. At one point the filter on the pump slipped and sucked up rotting leaves that clogged all the holes. I had to take the tube down to clean the holes. It was sort of a pain. Emitters might have made that process easier. Also emitters can control flow which was an issue at first with my tube. I had to balance pressure and gravity.
And the last question.. when you cut those slits, did you staple the front piece of felt to the back piece of felt to form a pocket, then put the dirt in then plant? Or did you just cut the slit, and put the plant in without dirt?
Great question. I really need to shoot a photo sequence of this but for now here's the description. We cut the slits in the first layer of felt (only the first layer gets cut), took the plant out of the small plastic pot, stuffed it in the slit, and then stapled around it to form a tight little pocket (about 4-5 staples).
Please keep your questions coming.
Thanks,
Matt
Wednesday, November 25, 2009
The Missing Woven Fabric
I went to Paris a few months ago and visited some Blanc greenwalls in person. I noticed that Blanc sometimes uses plastic woven or perforated fabric in between and behind the layers of moisture retention fabric.
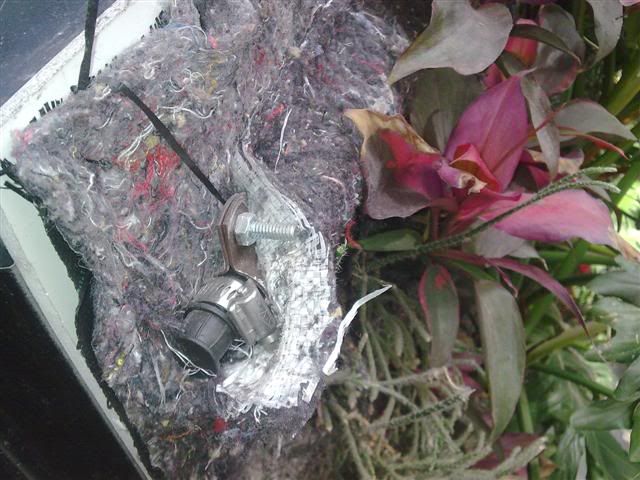
The black layer at the back and the white layer in the middle is the plastic. Image from the Lushe blog.
As you can see the felt is separated by two layers of woven plastic fabric. This fabric is commonly used in landscaping. I assume this fabric helps with evaporation and adds to moisture retention. It would also give the roots a structure to hold on to besides the felt.
Here's an example of the fabric on a landscaping site.

I did not use this fabric when I made my wall because I was unaware of it. I can't say that it has effected anything. I suspect it's more crucial in an outdoor wall where evaporation might be more of an issue.
I also saw Blanc use a perforated polyethylene sheet in between the layers of felt on the musée du quai Branly wall. It was thin clear plastic that looked like it had been punched with a needle over and over again. On that wall the woven was used as the back most layer. It would seem Blanc uses the woven as the back layer on all his walls. He also mentions it in his original description in Dwell I believe.
Here's a simple diagram for the use of the fabric. I have seen Blanc locate the water source behind all layers although in the above picture it's between the felt layers.


The black layer at the back and the white layer in the middle is the plastic. Image from the Lushe blog.
As you can see the felt is separated by two layers of woven plastic fabric. This fabric is commonly used in landscaping. I assume this fabric helps with evaporation and adds to moisture retention. It would also give the roots a structure to hold on to besides the felt.
Here's an example of the fabric on a landscaping site.
I did not use this fabric when I made my wall because I was unaware of it. I can't say that it has effected anything. I suspect it's more crucial in an outdoor wall where evaporation might be more of an issue.
I also saw Blanc use a perforated polyethylene sheet in between the layers of felt on the musée du quai Branly wall. It was thin clear plastic that looked like it had been punched with a needle over and over again. On that wall the woven was used as the back most layer. It would seem Blanc uses the woven as the back layer on all his walls. He also mentions it in his original description in Dwell I believe.
Here's a simple diagram for the use of the fabric. I have seen Blanc locate the water source behind all layers although in the above picture it's between the felt layers.

Tuesday, November 24, 2009
Super Secret Greenwall Plant List Revealed!
Venelin.Petkov said...
"Can you post a list of the plants you used and what nutrients are you using (I imagine you are not using pure water, since there are no minerals in the felt substrate). Thanks"
Llazar said...
"It would be great if could list the plants you used. Also, isn't there a problem of light? don't the plants need natural light in order to survive?"
People have asked me a few times now what plants I used and how I care for them. I'm happy to list what I can remember but honestly it doesn't matter as long as you match your plants to your wall. Each wall can be setup to provide varying amount of light, water, and nutrients. Patrick Blanc has used thousands of different types of plants on his walls. In theory almost any type of plant can work. I've even seen trees growing out of Blanc walls in Paris.
Each wall builder will need to decide how much light, water, and nutrients they want to provide. Here's a brief overview of my wall.
Light
I have pretty good light in the room but I decided to add some supplemental light from compact fluorescent bulbs. The lights aren't special "grow" lights. They are just regular bulbs. I think my wall would survive with out the additional light but the light helps the plants grow and makes the wall look nicer. Powerful artificial grow lights are available if you want to grow high light demanding plants.
Water
I water my wall 4x a day for 10 minutes a day (by drip tube on a timer). I had difficulty with the ferns on my wall drying out and dying at first. Originally I was watering 3x a day for a shorter period of time. I added a 4th time and increased the watering time to help the ferns. With the increase in water I saw an overall increase in growth from all the plants. If I had plants that needed even more water I'd make a larger basin and increase the frequency and amount of water.
Nutrients
I added fertilizer to my wall once in the time I have had it (just because a friend gave me some to try). I don't see the need to add more. We tend to trim our wall back when it grows out so more growth isn't required. We get new growth all the time so clearly the plants are getting what they need. Keep in mind that there is soil around the root ball of each plant. Also as the water trickles down the wall it picks up nutrients from the soil in each plant. At this point I wouldn't add more nutrients because my plants don't seem to need them. There are a variety of fertilizers on the market to suit just about any plant's needs.
Work with your local plant dealer to determine the plants that are right for your wall. Remember that on a small wall all the plants are in basically in the same environment so plants with different needs may die off. Also some plants cannot grow together. This can be determined from trial and error. Plant a range of plants with similar needs and see what does well. It's easy to add and remove plants from the little felt pockets.
Here's a partial list of plants I have on my wall listed in order of quantity.
Philodendron (35%)
Philodendron scandens “Green”
http://www.exoticangel.com/Varieties/ShowProductDetails.aspx?productid=210
Pothos (35%)
Epipremnum aureum “Marble Queen”
http://www.exoticangel.com/Varieties/ShowProductDetails.aspx?productid=224
Fern (15%)
Nephrolepsis exaltata “Fluffy Ruffle Fern” http://www.exoticangel.com/Varieties/ShowProductDetails.aspx?productid=68
Adiantum pubescens “Maiden Hair Fern”
http://www.exoticangel.com/Varieties/ShowProductDetails.aspx?productid=73
Asplenium nidus “Bird’s Nest Fern”
http://www.exoticangel.com/Varieties/ShowProductDetails.aspx?productid=64
Nephrolepsis cordifolia “Lemon Button Fern”
http://www.exoticangel.com/Varieties/ShowProductDetails.aspx?productid=71
Nephthytis (10%)
Syngonium podophyllum “Various”
http://www.exoticangel.com/Varieties/ShowProductDetails.aspx?productid=320
http://www.exoticangel.com/Varieties/ShowProductDetails.aspx?productid=188
Ivy (5%)
Hedera helix “Various”
http://www.exoticangel.com/Varieties/ShowProductDetails.aspx?productid=133
http://www.exoticangel.com/Varieties/ShowProductDetails.aspx?productid=144
http://www.exoticangel.com/Varieties/ShowProductDetails.aspx?productid=168
Sunday, November 22, 2009
Call for Walls
If you've made a wall please send me pics so I can post them here. If you are about to make a wall please document the process and send me a link to a video or a bunch of pics to post. I'd love to hear about the challenges and solutions of your particular wall. Got a wall nearby that you love? Take some pics and I'll post them and link to the location of the wall so that others can see it too.
New Patrick Blanc Interview Video
Well it's new to me at least. Nice shots of plants being put in the wall. You really see just how simple the little pockets for each plant are. Enjoy.
Three New Greenwalls!
I've got three new walls to talk about for this post.
Wall #1
Made by my friend, and greenwall consultant, Tina Dituri this wall was just made in New York City. Tina and I have been swapping notes as this wall is fairly similar to mine. More pictures to come but here's a photo of the wall in progress.

Wall #2
This wall is posted on youtube by Peter Kastan in Miami as a response to my video. Peter and I have been corresponding and it's great to see his wall finished and looking great. This videos shows the last plant being planted and a bit of a mishap.
Wall #3
My wife just got back from a whirlwind European tour (London, Paris, and Milan) She was tipped off by a friend in London about this wall in the Anthropologie store. This wall uses a modular system not the Blanc system. I have heard these modular walls can be difficult to maintain. Please comment if you've had experience with the modular system.
View Larger Map


Keep your questions coming I'll do my best to answer them here.
Tuesday, November 10, 2009
Antonino's Questions
Antonino emailed me to ask.
> 1. How did you build the basin? Is the basin attached to the structure at all?
My Basin is built from PVC (bad stuff). It is not attached to the wall. It just sits under the edge of the wall. I would have preferred to use stainless steel (expensive) or even some kind of plastic basin. Unfortunately my wall is curved so it had to be something custom.
> 2. How does the structure stand? Are the aluminum pipes screwed to the closet itself?
Yes the aluminum is screwed to the top of the closet and to the floor.
> 3. How many gpm is the pump you are using?
Unfortunately I don't remember. When you buy your pump it will be rated to pump water vertically up to a certain height. I would say in general you can go to the lower end of the range. You don't need the kind of force these pumps are rated for to water a wall.
> 4. How thick is the tubing you use for irrigation?
Also don't remember exactly but I'd estimate the vertical tube at 1.5" and the tube across the top at .5"
Thanks for your questions and good luck with your wall.
If you have any greenwall building questions please send them to m at blackcross.cc
Thanks,
Matt
Monday, November 9, 2009
DIY Greenwall Materials list
People ask me about the specific materials I used to make my wall here's a list and some links and also some less expensive and more environmentally friendly alternatives. Please keep in mind I am not recommending specific sites or vendors to purchase these through. I only show them as examples of what you'll need. I would encourage you to try to source your materials locally to support local businesses and to avoid shipping fees.
Frame:
1" Aluminum Square Stock I bought mine at a local hardware store. It was pretty expensive. I forget exactly how much I used.
Cheaper Eco Alternative
FSC Cedar Strips 1"x3"s Cheaper than aluminum and far better for the environment. I'd build my next wall with these.
Surface:
Sintra Expanded PVC Sheets 6mm I would never use this material again. I only used it the first time because it's what Patrick Blanc suggests. It's heavy expensive and really bad for the environment. I bought it at a local plastic store on Canal street in NYC and they only had 6mm so I bought double to get to 12mm. Really I only needed 10mm but they didn't have 10mm sheets.
Cheaper Eco Alternative
Corrugated Polyethylene Plastic Sheets 10mm
I think these sheets would work just as well and I would build my next wall with these. Some things to test would be how well they hold staples and how stiff the material is at this thickness. Also if you do your research you can find these sheets made partially from recycled plastic.
Fabric:
Moisture Retention Mat MRM14 (100% recycled polyester and polypropylene) The owner of Green Roof Solutions is willing to sell the fabric in amounts suitable for walls as small as 4x8.
Misc:
Rust Proof Staples 12mm (you may need to tailor the length depending on the thickness of your surface material) These are rust proof not rust resistant. There is no iron in them so they can never rust. Expensive but worth it.
Submersible Pond Pump I'm not sure this is exactly the one I have. It looks just like this one but mine may be the size up from this one. Regardless you'll need to tailor the pump to the size and height of your wall. I made this one work although I probably could have used a smaller cheaper pump. I bought mine at my local pet store. They fitted the pump with adapters so I could connect it to polyethylene tubing from my local hardware store.
Patrick Blanc father of the Greenwall

Patrick Blanc is the father of the greenwall. He came up with the system that I use. I have seen his walls in person in Paris and they are amazing. There are many imitators out there but no system, to my knowledge, works as well as Blanc's. When I say works as well the factors in my mind are cost, maintenance, beauty, and longevity. For more info on Patrick Blanc go here:
Patrick Blanc's Site
A great book by Patrick Blanc
A documentary about Patrick Blanc (I could only find it posted in
The New York Times article that introduced me to Patrick Blanc
How I Built My Wall

My greenwall is based on Patrick Blanc's design. Here's a quote from him describing his system published in Dwell Nov 2006:
"10mm thick waterproof PVC slabs covered with polyamid felt, into which holes (pockets actually) are cut for plants; a small hose, punctured every 10cm by a 2mm hole, to run the length of the top of the wall; a timing device to ensure regular, light watering- like a trickle slowly wending its way down a mossy rock. The ensemble is then attached to a metal structure that stands out from a supporting wall, trapping a cushion of air, which acts as insulation."
That's basically exactly what we built. The frame is a lattice work of 1" aluminum ("aluminum square stock" is what you google)tubes. Sheets of expanded PVC (Sintra is the brand name I used) have been screwed on with rust proof screws. Then 2 layers of the moisture retention mat (synthetic felt sourced from Green Roof Solutions product number MRM14) is stapled on with rust proof (Arrow Brand "Monel") staples. There is a submersible pump on a timer that pumps water up to a tube running under the felt across the top of the wall. There is a basin at the bottom of the wall also built from expanded 3/4" PVC.
We planted 3.5 inch plants in slits 5" wide separated horizontally by 2" gaps. The rows were 4" apart vertically and the plants are staggered every other row.

Welcome to DIY Greenwalls
About 6 months ago I made an 80sqft greenwall in my New York apartment with about 400 plants on it. I took time lapse photos of the planting process and made a movie out of them and posted them on youtube. In 6 months I've gotten almost 18,000 views and countless emails and comments from people who want to build there own walls .
I decided it was time to make a blog where I could post more info for people who want to make there own walls. Also I'm interested in making walls for other people too so contact me if you'd like to hire me to help you make a wall.
Please suggest topics for posts or write your own and send them to me. I can be reached at m at blackcross.cc
Thanks,
Matt
Subscribe to:
Posts (Atom)